Tuesday, May 28, 2013

The End of an Era

I'm confident that 90% of you reading this will not understand why I feel compelled to write this post, and 100% of you will laugh about it, but here goes anyways.

I stand at a crossroads in my life.  Without consciously realizing it at the time, I hit the 20 year mark a little while back.  I guess I felt like it was time for a change, time to try something a little different.  I'm talking, of course, about my pocket multi-tool.


I've carried a Swiss Army knife in my pocket since I was 14 years old.  Since that first knife, I've upgraded, changed models, occasionally down-sized to save room, but always stuck with that familiar red tool.  As anyone who's owned one knows, the Swiss Army knife is fantastically useful.  From the entry level Classic Pocket Knife (with pen knife, file, scissors, toothpick, and tweezers) up to the completely over the top Swiss Champ (seriously, it's got 31 tools and weighs a hefty 6 oz), you can find a model that fits any need.

I've had my latest model for at least 4-5 years now (can't remember exactly the last time I bought one), and I still love it, but I felt like maybe it was time for a change.  Kristen is baffled by this, as I tend to be a "don't fix it if it ain't broke kind of guy" (her words, very true).  And it's true, I'm a creature of habit, I find the things I like and I stick with them.  I can't fully explain why, but I felt like it was time to branch out from my familiar red handyman tool.

I started looking at reviews of some other popular brands and came across an unfamiliar acronym: EDC.  After a quick Google search (and ruling out some pretty hilarious options - Electric Daisy Carnival, seriously?), I learned that in the DIY world this stands for Every Day Carry.  There's actually a whole culture out there built around the fact that what we carry on us every day says a lot about our core persona, there's some pretty intense stuff (check this site out for example).  I'm not that crazy about it, but I did want a nice multi-tool with great features that I could carry in my pocket without weighing me down too much.  I eventually settled on the Leatherman Wingman.


Out of the box the Wingman is slightly wider than my Swiss Army, but not as deep, right about the same length, and maybe an ounce heavier.  I really loved the all-stainless look and the mechanical feel - this looks like a tool that's designed to do things.  I've been living with it for about a week, and I'm happy to say that I think I made a good choice.  So, now we have to compare under the hoods, of course.  First, my steadfast Swiss Army:


This particular model has 12 tools: a large and small knife, scissors with spring handle, large flat head screwdriver + bottle opener, small flat head screwdriver + can opener, phillips head screwdriver, corkscrew, and several others that aren't shown because I couldn't open them (seldom used: awl, parcel carrier, and plastic magnifying glass).  All the ones shown above are crazy handy, and I used something on my knife at least 4-5 times a day.


Now, the Wingman.  Without opening up the main part, you can access the knife and scissors.  Both can be opened one handed and both have a locking mechanism to prevent closing - especially nice on the knife for obvious reasons.  I like that I can open and close the knife one handed, quite handy when you're holding something with the off hand already.


Opening up the tool transforms the main part into a spring loaded set of pliers, both needle-nose and regular, with wire cutters at the base of the pliers.  This also gives you access to the rest of the tools: phillips head screwdriver, large flat head screwdriver, can+bottle opener, file+ruler+small flat head screwdriver, and plastic package opener (haven't tried this one out yet).  This is a really nice range of tools for my use without going overboard.

I have to say that the pliers alone have made this a fantastic purchase.  I can't tell you how many times I've encountered situations where I just needed some pliers for a few seconds and didn't want to or couldn't run out to my truck, garage, etc.  Seriously, pliers are handy.  And of course I've known for years how handy it is to have 2 screwdrivers at your fingertips.

Well I'll wrap this one up.  Hopefully provided some entertainment and a change of pace.  I'll be back soon with more posts about our garden (first big harvest!) and entertaining Liam stories.  My new multi-tool is fully 100% Liam approved, by the way.  I believe his exact words on first seeing it were: "Oooh, Dada's new tool is pretty!"

Tuesday, May 14, 2013

Garden #3: Growing and first fruits

So far so good on actually doing some semi-regular blog posts.  Full disclosure - this entire post is about plants, gardening, and watching stuff grow.  If that's not your particular cup of tea feel free and skim, but you should also give it a shot, it's deceptively and fascinatingly interesting (plus there's some great photos).  There are also a few great shots of Liam and Kristen in here, too.

Last time around we had just seen all the plants safely planted in the garden and getting happy.  Here's a shot of the group one week after that:


These are some tomatoes on our "Early Girl" variety right about this time (4/22).  As you can see they're still very green, but you'll be amazed how fast they get color.


I had gotten out my nice Canon to take these and some other photos, and I grabbed some fantastic ones of Liam, too.


I also got a few great ones of Kristen and Liam together.  Here they're both doing Liam's trademark smile:


And this one is just photo gold:


About a week later (4/28), we found our first squash blossom!  I also found out an interesting fact about squash (and zucchini) blossoms - they open for an hour or two in the mornings, then close back up, and then keep repeating that every day for 1-2 weeks before they dry up and fall off.  Fascinating!


Another shot of the Early Girl tomatoes - it's only been 6 days and those first ones are already starting to get some color.


The cucumber also started to put out little feelers - this one found the nylon trellis and wrapped around it all on its own, we didn't have to train it at all.  Pretty amazing.


Only two days later (4/30) and the Early Girl tomatoes are a strong orange-red.  Liam was so excited, we kept telling him that we couldn't pick any of the tomatoes until they turned red - when he saw these he got ecstatic (even though they still aren't quite ready).


Here's another round of top views to show the growth.  These are from 5/1, just 11 days after the photos at the top of this post.  Pretty astounding how fast this stuff grew, especially the squash and zucchini (squash are top left and bottom center, zucchini are top right and middle right)


Our tomatoes are starting to look like an impenetrable tomato forest.  The square foot gardening book recommended this tight of planting, but I think next time we'll space them out a bit so they can breathe.  Doing great though.


We also saw the first good looking squash of the season!  I managed to get out at the right time of the morning to get the blossoms open as well.


On the weekend a few days later I broke out my nice Canon and took a ton of photos of everything - I'll only inflict a few on you here.  These are some of the cherry tomatoes we have going - I absolutely love how they grow in a little array, so nice and neat.  The engineer in me can't help but appreciate and love that design.


Also another example of the cucumber tendrils grabbing the nylon trellis - again completely on its own, no training at all.  Just amazing.


And those first Early Girl tomatoes are looking delicious!  They looked so good, in fact, that I told Liam we could pick them.

 
He was absolutely thrilled!  He got so excited about them, just held them, checked them out, and carried them around for the next 30 minutes.  These are just a few of my favorites during this time.


I jumped the gun on these just slightly - once we cut them open there was a tiny green spot in the middle, but we ate them anyways (as part of a caprese salad, yum).  They were unbelievably divine.  The closest I can come to describing the taste is that it was fuller in every sense than any store bought tomato - eating them side by side just made the store bought ones taste washed out.  I know you gardeners out there know this already, and maybe my taste buds were biased since I knew we grew these ourselves, but they really were amazing.

We're getting pretty close to being able to harvest our first squash I think.  I can't wait until we have enough to fill baskets!  More to come...

Friday, May 10, 2013

Garden #2: Final construction & planting

Back for more of our gardening adventures!  At the end of the last post we saw the garden filled and the soil amended with our lovely compost.  Now it's time to put the finishing touches on this garden and make it, well, awesome.

First up, I made the frame for a trellis out of stainless steel electrical conduit.  I highly recommend this stuff, it's cheap, durable, weatherproof, and just fun to work with.


Next up we laid out a grid with nylon twine.  Kristen found 2 great books on gardening - one that we really like is "Square Foot Gardening" by Mel Bartholomew.  Very cool book, lots of great info, and bonus for me: he's an ex-engineer turned professional gardener, so there's lots of great tips (like the conduit for the trellis frame).  Anyways that's where we got the idea to lay out a 1'x1' grid for planting.


Kristen had already found a few plants at a great nursery outside of Houston, so we went ahead and got those in the ground.  Way more of those to come.


Finally, the reason for the PVC pipes earlier - the ones in the garden serve as anchor spots for more PVC to create a frame to put bird netting over.  My original plan was to get the 1/2" PVC lengths you can see below (standing straight up) and have them bend from one side to the other, creating a covered wagon look.


However, we realized that by putting the garden right next to the fence, there was another interesting opportunity, plus I realized I had made a trellis that wouldn't fit under the original loop.  I found these cool steel flanges at Lowe's (plumbing section), bolted these to the fence...


And voila!  Custom frame for the netting extending all the way to the fence, and more importantly, over the trellis I had put up.


I attached some bird netting to the frame and also put up the nylon trellis material on the conduit to create the finished trellis.  In a flash of brilliance I bought some 1/2" round dowel pieces and attached them to the bottom of the bird netting (check out around the edge below).  This gave a really handy way to easily lift the netting in sections to get at the actual garden...


...like so.


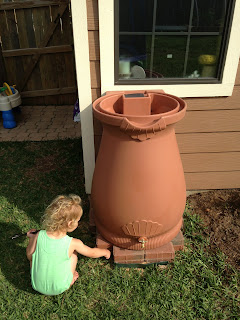
 Last but certainly not least, we picked up a rain barrel and I tied in the gutter on the back of the house so that we can always (or just mostly) water the garden with rain water instead of tap.


That's about it for the construction.  You may have noticed in the last few pictures some plants magically appeared.  Here are some shots showing close ups of the plants in their infancy.  First, the left half.  Going top to bottom, left to right, starting in the top right corner we have: squash, cantaloupe, chinese eggplant, squash, zucchini, zucchini, cucumber, sage, and basil.


On the right side is basically all tomatoes - we went a little tomato crazy, I think Kristen picked out 12 different varieties if I remember correctly.  We figure we'll see which ones grow well and which ones we like and refine our choices for next year :)


All of this initial planting happened by April 12 or so - thanks to a timely rain right after I installed the rain barrel, we've been able to water the garden exclusively with rain water, and the plants definitely have loved it!  Next update, I'll show the growth of the plants up to now along with the first fruits!

Garden #1: Initial construction

So Kristen and I have wanted to have a garden for years, and this year we finally figured we could pull it off now that Liam's a little older and easier.  We started doing a lot of research on different types and quickly decided that a raised bed would be ideal - you don't have to worry about your soil and any amendments, they're well draining and modular, you don't have to bend over as far when working in them, and (most importantly) I get to build something.

We decided to start with just one 4'x8' plot - all the tips we read repeatedly mentioned that first time gardeners' biggest mistake is usually starting too big.  I went with cedar for the structure (2x6's for the frame and 4x4's for the posts).


This one was pretty straightforward, but still fun.  Just had to cut the 4x4 post into sections and 2 of the 2x6's in half, then start drilling and screwing together.  The eagle-eyed among you will have spotted the PVC - I'll explain that later.  I had a great helper throughout this whole project (note his tools in the bottom of the next photo).


If you're wondering I built this upside down, the posts sticking up will go into the ground to anchor it in place.


We wheeled this back into the backyard, got it in place, dug the holes for the posts to sit in, and set it in the ground.  Those are cut pieces of 1" PVC bolted on the insides - you'll see why those are there in a bit.


We got a bunch of old newspaper and some really great dirt and started fillin' her up.


 We've also had a big compost bin going for about a year and a half, we finally got to use some of it!!  That's some seriously good plant food right there.


Forget the gym, just till a garden by hand with a shovel.


Ah, finally finished - that garden is ready for planting!


Stay tuned for update #2 - final construction and planting!