First up, I made the frame for a trellis out of stainless steel electrical conduit. I highly recommend this stuff, it's cheap, durable, weatherproof, and just fun to work with.
Next up we laid out a grid with nylon twine. Kristen found 2 great books on gardening - one that we really like is "Square Foot Gardening" by Mel Bartholomew. Very cool book, lots of great info, and bonus for me: he's an ex-engineer turned professional gardener, so there's lots of great tips (like the conduit for the trellis frame). Anyways that's where we got the idea to lay out a 1'x1' grid for planting.
Kristen had already found a few plants at a great nursery outside of Houston, so we went ahead and got those in the ground. Way more of those to come.
Finally, the reason for the PVC pipes earlier - the ones in the garden serve as anchor spots for more PVC to create a frame to put bird netting over. My original plan was to get the 1/2" PVC lengths you can see below (standing straight up) and have them bend from one side to the other, creating a covered wagon look.
However, we realized that by putting the garden right next to the fence, there was another interesting opportunity, plus I realized I had made a trellis that wouldn't fit under the original loop. I found these cool steel flanges at Lowe's (plumbing section), bolted these to the fence...
And voila! Custom frame for the netting extending all the way to the fence, and more importantly, over the trellis I had put up.
I attached some bird netting to the frame and also put up the nylon trellis material on the conduit to create the finished trellis. In a flash of brilliance I bought some 1/2" round dowel pieces and attached them to the bottom of the bird netting (check out around the edge below). This gave a really handy way to easily lift the netting in sections to get at the actual garden...
...like so.
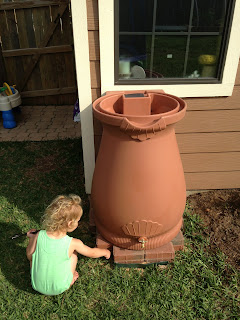
Last but certainly not least, we picked up a rain barrel and I tied in the gutter on the back of the house so that we can always (or just mostly) water the garden with rain water instead of tap.
That's about it for the construction. You may have noticed in the last few pictures some plants magically appeared. Here are some shots showing close ups of the plants in their infancy. First, the left half. Going top to bottom, left to right, starting in the top right corner we have: squash, cantaloupe, chinese eggplant, squash, zucchini, zucchini, cucumber, sage, and basil.
On the right side is basically all tomatoes - we went a little tomato crazy, I think Kristen picked out 12 different varieties if I remember correctly. We figure we'll see which ones grow well and which ones we like and refine our choices for next year :)
All of this initial planting happened by April 12 or so - thanks to a timely rain right after I installed the rain barrel, we've been able to water the garden exclusively with rain water, and the plants definitely have loved it! Next update, I'll show the growth of the plants up to now along with the first fruits!


Man, I tried cantaloupe one time. You have to water it a TON like everyday. But I also had watermelon on there so that might have also been why.
ReplyDeleteYep the cantaloupe definitely likes water - actually the squash and zucchini are the real heavy drinkers so far, it hasn't even gotten that hot yet and they need full watering at least every 1.5 days!
DeleteI'm very much looking forward to raiding your garden and gorging myself on vegetables all summer long. Have a great week!
ReplyDelete